In this article, we are going to talk about:
-
Color correction mode
-
Tonal ranges
-
The Waveform Monitor
-
Adjusting exposure in clips
-
Applying color correction to clips
-
Working with Lumetri Effects
About Color Correction Mode
All of the effects that you will need to correct the color and brightness in your video can be found in the Effects panel. However, to make it easier to access these tools, Premiere Pro also created a special workspace just for color correction.
You can access the Color Correction workspace by going to Window>Workspace>Color Correction.
The Color Correction workspace is pictured below.
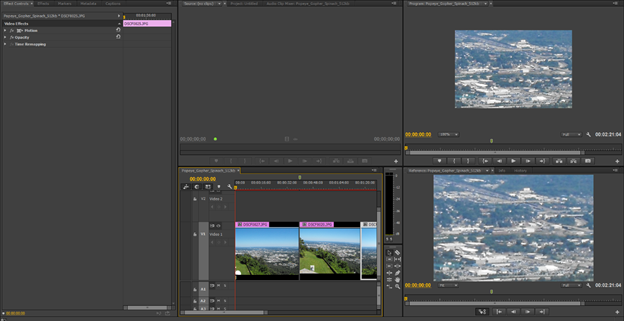
This workspace can provide three different views of your video. You can "gang" the Source Monitor and Program Monitor via the Source Monitor panel menu. This will show you two views of your video that give you a glimpse of "before" and "after."
About Tonal Ranges
The Program Monitor shows you the tonal range view. When you make some adjustments to brightness and contrast, your video gets divided into three tonal ranges. These ranges are shadows, midtones, and highlights.
There are a few effects in Premiere Pro can help you adjust these ranges.
The Three-Way Color Corrector gives you the ability to adjust each of these ranges.
The Three-Way Color Corrector can be found in the Effects panel. As with all effects, drag it to your video, then open the Effect Controls panel (on the left in the workspace).
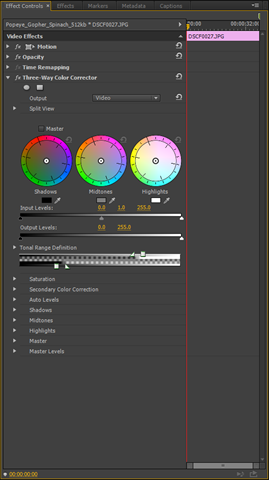
The three color wheels pictured above let you adjust shadows, midtones, and highlights.
The important thing with color correction is deciding what tonal range needs to be adjusted, then make the adjustment using a Premiere Pro effect.
If all tonal ranges need to be adjusted equally, you can use the Brightness & Contrast effect or the Fast Color Corrector effect.
Other effects you can use are:
-
The Shadow/Highlight for exposure adjustment
-
The Gamma Correction for exposure adjustment
-
The Three-Way Color Corrector for color adjustments
To see the tonal ranges in the workspace, apply the Luma Corrector effect. Choose the Tonal Range output.
The Waveform Monitor
The Waveform Monitor can be accessed through the Reference Monitor.
To view the Reference Monitor, go to Window>Reference Monitor.
In the workspace, it can be found on the bottom right hand side, as pictured below.
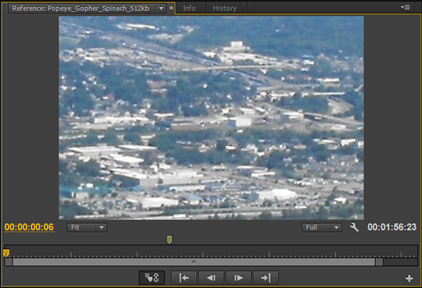
Click the Settings button in the Reference Monitor. Again, the Settings button always looks like a wrench. Select YC Waveform.
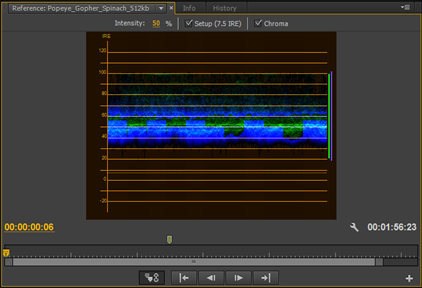
You can see the Waveform Monitor in the snapshot above.
To configure the waveform monitor, uncheck the Chroma check box at the top. We have circled it for you below.
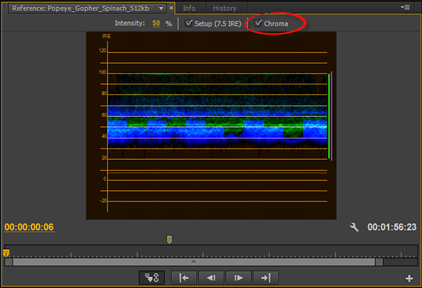
Also, uncheck the Setup (7.5 IRE) checkbox. What this will do is set the scope's black level to 0.
Next, set Intensity to 100% so it is easier to read.
In the snapshot below, you can see both the Program Monitor and the Waveform Monitor.
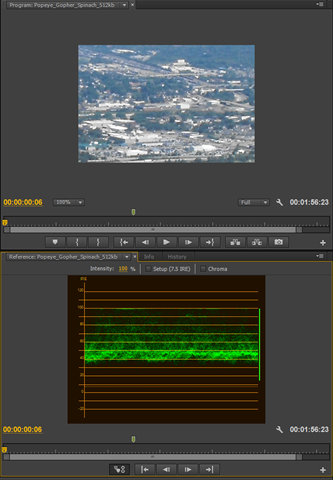
In the Waveform Monitor, you can see the brightness of the pixels in that frame range from 20 to 100 IRE scale. (IRE stands for Institute of Radio Engineers.)
If you had pixels that had values lower than 0 or higher than 100, you would start to lose detail. This is called clipping or crushing.
If you want a good exposed shot, you should see the whitest highlights at around 100 IRE. The blackest shadows would be at around 0 IRE. Midtones should be around 70 IRE.
In other words, our frame in the snapshot above has good exposure.
Adjusting Exposure
To adjust exposure, you can use the Shadow/Highlight effect.
To do this, go to the Effects panel.
Find the Shadow/Highlight effect under Video Effects.
Drag the effect to the clip.
When the effect is applied, Auto Amounts are enabled, so the adjustments are made automatically.
If you want to adjust the amounts yourself, go to the Effect Controls panel.
Uncheck the Auto Amounts box, as pictured below.
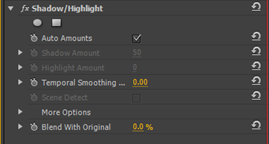
Adjust the amounts until the highlights, shadows, and midtones are within the proper ranges for good exposure in the clip.
If this effect does not give you the results that you need, you can also try the Gamma effect. This effect will lighten or darken your clip without changing the shadows or highlights. It changes the brightness level of the midtones.
Applying Color Correction
Color correction can either be a really quick process that only takes a matter of minutes, or you can take your sweet time getting everything perfect (and it could take a while). That Fast Color Corrector is ideal for fast corrections; whereas, the Lumetri look takes longer.
We will talk about the Lumetri look later. For now, let's talk about other ways to adjust color.
The RGB Parade scope lets you see how the levels of red, blue, and green there are in a clip. For example, if a clip is looking blue, you might look at the RGB Parade scope and see that the blue is dominating the red. That would explain the blue look.
To view RGB Parade, click the Settings button in the Reference Monitor.
Choose RGB Parade.
It is pictured below.
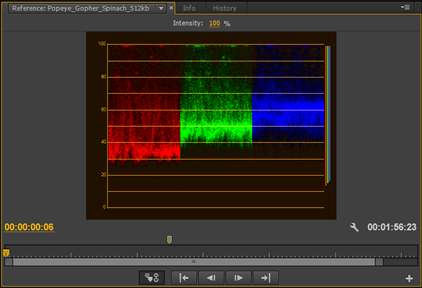
As you can see in the snapshot above, you can see the levels of red, green, and blue pixels in a clip. However, before you assume there is too much green, for example, please keep in mind the content in the clip (there may be a lot of red in the subject).
If you see that a color is dominant over the others, and it cannot be explained by the color of the subjects, then it is time to use the Fast Color Corrector.
To use the Fast Color Corrector, go to the Effects panel.
Drag the Fast Color Corrector effect onto your clip.
You want to make sure that if you have used another effect for color and brightness that the Fast Color Corrector appears below these effects in the Effect Controls panel.
You can configure the Fast Color Corrector effect in the Effect Controls panel.
Working with Lumetri Effects
SpeedGrade is Premiere Pro's color grading component. One of the outputs of SpeedGrade is LUT, or Lookup Table). LUT contains instructions for adjustments to color and exposure so that you can achieve a certain look. Premiere Pro comes with looks that you can apply, or you can create your own. When you apply a Lumetri effect to a video, you are creating a look or feel
The best way to apply a Lumetri effect is to use an adjustment layer to do so. You apply the effects to the layer, and the layer is applied over the clips. Any effects you apply to the adjustment layer will affect the clips.
To do this, let's start out by creating and adding an adjustment layer first.
To add an adjustment layer, open the sequence for which you want to add an adjustment layer.
Go to the Project panel. On the bottom right hand side, click the New Item button.
Select Adjustment Layer.
You will then see the Adjustment Layer dialogue box.
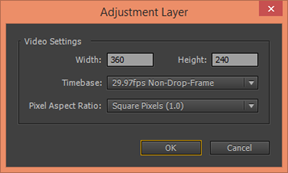
If you want to create the adjustment layer using the configuration for the sequence you selected, click OK.
The adjustment layer is then created. It is added to the Project panel. You can rename it if you want.
Next, drag the adjustment layer over the clips.
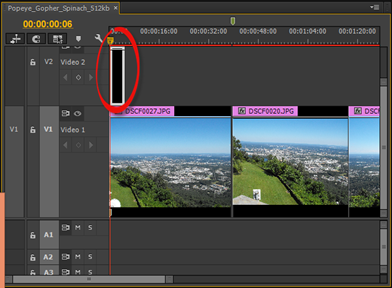
To add a Lumetri look, go to the Effects panel.
Find the Lumetri Looks folder.
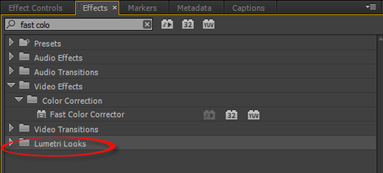
Click the triangle to the left of the folder to see the various subfolders and the available looks in those folders.
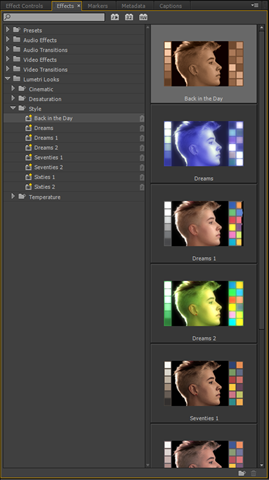
Choose the look that you want. We are choosing Back in the Day.
Drag the look to the adjustment layer. The look will be applied to any clips under the adjustment layer.


