-
The Tools panel
-
Navigating the Timeline
-
Monitoring footage
-
Sync Lock and Track Lock
-
How multiple tracks display in Premiere Pro
-
How to move clips to the Timeline
-
Insert and overwrite edits
-
Three-Point and Four-Point edits
-
The Program Monitor
The Tools Panel
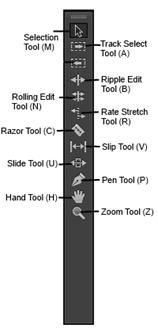
Before we jump into learning more about the Timeline, it is important that we talk about the Tools panel that is located between the Timeline and the Project panel.
It is pictured (and labeled) below.
Navigating the Timeline
Being able to zoom in and out, move around, and arrange the components in the Timeline will become necessary skills as you work in Premiere Pro. You need to see what you are doing, and you need to be able to see what you are working on. Knowing how to do these things will enable you to do that.
NOTE : Of course, you can maximize the Timeline by pressing the accent key on your keyboard (`). It is located to the left of the 1 key and above the Tab key.
Zoom In or Out
To zoom in and out of the timeline, grab an edge of the zoom bar as we learned to do in the Source Monitor. Drag inward to zoom in. Drag outward to zoom out. You can also use the Zoom tool in the Tools panel by going to the location you want to zoom in/out on and clicking your mouse as many times as needed (after clicking on the tool).
Adjust Track Space
You can adjust space between video and audio tracks. To do this, go to the track header. Put your mouse pointer over the dividing line between audio and video tracks. You will then see the height adjustment pointer.
Next, drag downward to hide audio tracks. Drag upward to hide video tracks.
This will maximize the space for editing audio or video tracks.

Moving Around Premiere Pro
You can move the scroll bars on the right side of the Timeline up and down to scroll through and find tracks.
You can move the horizontal scroll bar left and right to view different frames.
You can also move the playhead by clicking on and it dragging it to a new location.
Monitoring Footage
Most projects in Premiere Pro will have multiple audio and video tracks. As you work on your project, you can adjust the program so that you only hear or see certain tracks.
Here's how you do it:
To disable a video track, click the Toggle Track Output button. We have circled it below.
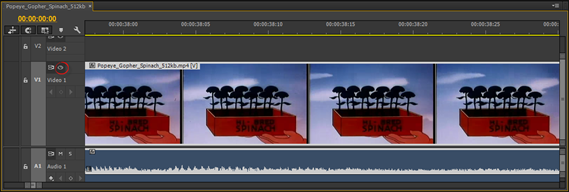
This disables a track. When you disable a track, it no longer appears in the Program Monitor. In addition, you will see a slash over the button that you just clicked.
To re-enable the track, click the Toggle Output button again.
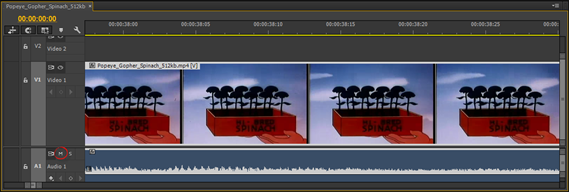
To mute an audio track, click the M in the track header for the track you wish to disable.
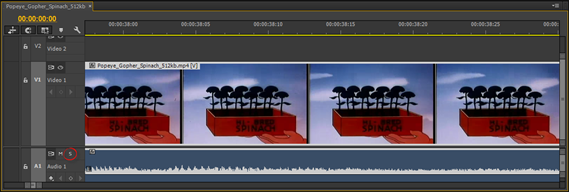
If you want to solo an audio track, click the S in the track header for that track.
Sync Lock and Track Lock
In the snapshot below, we have two video tracks loaded onto our Timeline.
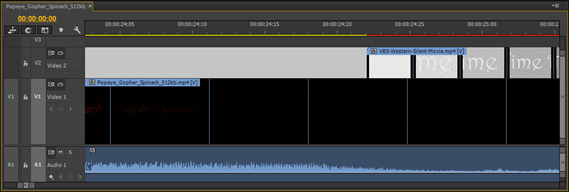
By enabling Sync Lock, we can be sure that all tracks will be made equally affected by adjustments made to the track. If we add a 10 second clip, for example, at the beginning of the video, we would want both existing clips moved equally to the right ten seconds. In other words, we would still want the tracks "lined up" further right on the Timeline the same way that they were before we inserted the clip.
Sync Lock is turned on by default.
Track Lock locks a track from editing or from adjustments made to other synced tracks.
To enable or disable Sync Lock, click the Toggle Sync Lock button, circled below. When it is disabled, a slash will appear through it.
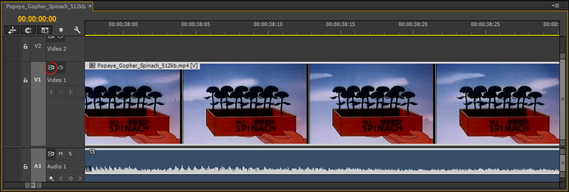
To enable or disable Track Lock, click the Track Lock button, circled below.
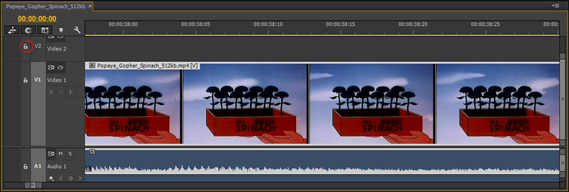
When Track Lock is on, the padlock icon will be a locked padlock.
How Multiple Tracks Work in Premiere Pro
If you are new to Premiere Pro, you may be wondering how multiple video tracks work when you play the video. It may even seem like having multiple tracks will result in several clips playing over the top of each other.
In Premiere Pro, video tracks are combined from the top down. Whichever video track is above another track is the one that will be viewed in the video. The only way to change that is to make higher tracks transparent or smaller.
Multiple audio tracks are given equal weight, which means they will all be played. You can adjust the audio mix to fix this.
Moving Clips to the Timeline
There are several ways to move clips to the Timeline. We are going to discuss these methods in the sections below. The method that you use will depend on what's easiest and quickest for you, as well as your comfort level with each method.
Dragging Clips
The easiest way to move a clip to the Timeline is to drag it with your mouse.
To do this, drag the clip from the Source Monitor to the location on the Timeline where you want to place it. Premiere Pro inserts both the audio and video from the clip. If you want to drag only audio or only video, use the Drag Video Only or Drag Audio Only buttons in the Source Monitor.
Targeting Tracks
Source Track Indicators are located on the Timeline to the left of the tracks. They will identify the tracks that Premiere Pro will insert the audio or video clip you are using from the Source Monitor.
The Source Track Indicator is circled below.

To use the Source Track Indicator to target a track, click the Source Track Indicator, then drag it to the desired track.
Using Button Controls
You can also use Button Controls to insert a clip. To do so, first drag the source track indicators to the track that you want to target.
Next, move the playhead to the location where you want to insert the clip.
Click either the Insert button  or the Overwrite button
  in the Source Monitor.
About Insert and Overwrite Edits
It is important that you understand the difference between insert and overwrite edits. If you fail to recognize the difference between the two, it can cause you huge headaches when you are inserting clips from the Source Monitor into the Timelime.
When you use the Insert button to insert a clip into a track, everything after that clip shifts to the right. Make sure Sync Lock is enabled when you insert clips this way.
If you click the Overwrite button, you replace the footage, so the track doesn't shift at all.
Three-Point and Four-Point Edits
If you look at the title of this section, you will see it is "Three-Point and Four-Point Edits." If you are new to Premiere Pro, you are sitting there right now wondering just how difficult it is going to be. It sounds difficult, like something a Hollywood producer would do in the process of finalizing a movie.
However, it is not difficult at all. In fact, we have already been doing three-point edits. Two points were in the Source Monitor when we marked In and Out points and moved the playhead. If you did not mark In and Out points before moving a clip to the Timeline, then it is the beginning and end of clip. The third point is when you pressed either the Insert or Overwrite button. That is a three-point edit.
A four-point edit comes when you want the clip to end at a certain point, or you need to fill a gap on the Timeline.
To make a clip end at a certain point, move the playhead to the target Out point – or where you want the clip to end. Next, go to the Program Monitor and click the Mark Out button  . You can also press O.
Next, drag the source track indicators to the track you want. (Be sure you have In and Out points set in the Source Monitor.)
Press the Overwrite button in the Source Monitor.
If you want to fit to fill a gap, move the playhead to the target Out point, then click the Mark Out button in the Program Monitor.
Next, move the playhead to the target In point in either the Program Monitor or Timeline.
Click the Mark In button  . You can also press I.
Now, drag the source track indicators to the track you want. Make sure the In and Out points are set in the Source Monitor too.
Press the Overwrite button in the Source Monitor.
You will then see the Fit Clip dialogue box.
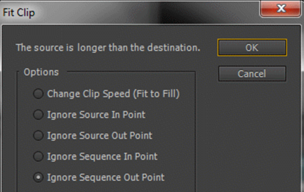
Since you want the clip to fill a gap, click the Change Clip Speed (Fit to Fill).
Click the OK button.
About the Program Monitor
We already know that the Source Monitor displays clips. The Program Monitor displays output from the Timeline. For that reason, the timecode you will see in the Program Monitor will always match the timecode you see in the Timeline.
Below is a snapshot of the Program Monitor with all its controls labeled.
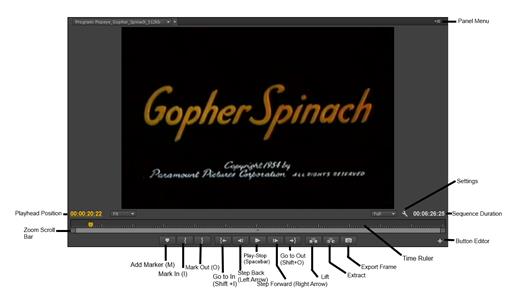
You can configure the Program Monitor by going to the panel menu.
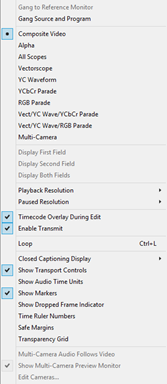
The configuration options include:
-
Mode selection . We talked about the modes when we discussed the Source Monitor.
-
Interlaced display . You can display the first, second, or both fields.
-
Playback resolution . Control both playback and paused resolution.
-
Show Transport Controls . You can chose to only use keyboard shortcuts. The transport controls will be hidden.
-
Show Dropped Frame Indicator . This is also something common to the Source Monitor.
-
Time Ruler Numbers . This is disabled by default. It is enabled by default in the Timeline.
-
Safe Margins . These are the same as with the Source Monitor.
The button editor in the Program Monitor lets you choose the buttons you see in the Program Monitor:


