?
In this article, we will learn about:
-
The Timeline controls
-
Customizing the Timeline
-
Adding single audio and video tracks
-
How to change the Timecode display
The Timeline Controls
A snapshot of the Timeline is shown below. We have labeled the different buttons and controls for you. You can reference this as we work with the Timeline.
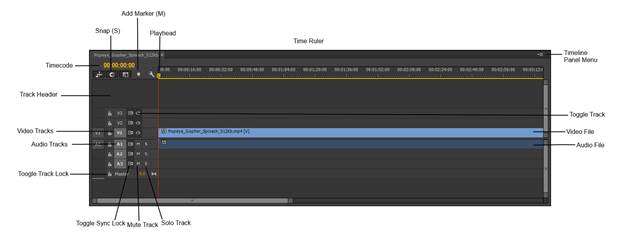
Don't worry! You will learn to use all the tools and features we have labeled above on good time.. For now, however, let's cover a brief description of some you may not recognize by their name alone.
-
Time Ruler displays time within the Timeline. It goes from left to right.
-
Timeline Panel Menu offers configuration options for the Timeline.
-
Toggle Track turns a track on and off. If you turn it off, you will not see the content in the Program Monitor.
-
Solo Track plays the audio for that track only during playback.
-
Mute Track mutes that track during playback.
-
Toggle Sync Lock toggles Sync Lock on and off. Sync Lock keeps tracks in sync during edits.
-
Toggle Track Lock toggles locking on and off. When you lock a track, you cannot edit the content.
-
Track Header is the area to the left of the Timeline track.
-
Timecode shows you where the playhead is at in your project.
-
Snap (S) controls if items are snapped to each other when moved.
-
Add Marker (M) adds a marker to the Timeline.
Customizing the Timeline
Having the right tools and features to work on your project is important. However, it is also important to be able to customize the different panels to make editing easier. Now we are going to learn how to customize the Timeline.
We are going to learn how to:
-
Customize the track height
-
Increase the height of audio or video tracks
-
Increase or decrease the height of a single track
-
Turn track thumbnails on or off
-
Changing the appearance of thumbnails
-
Customize audio tracks
Customizing the Track Height
As you can see in the snapshot below, the track height is small by default. You cannot see any of the content because they are so small.
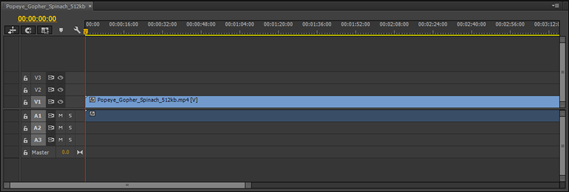
To increase the track height, click the Timeline Display Settings button. This looks like a little wrench. We have circled it in red in the snapshot below.
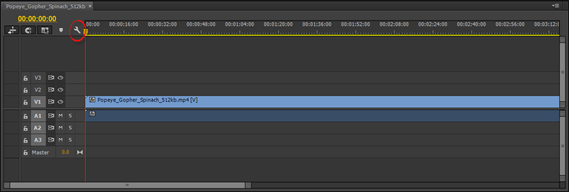
This opens the Settings menu. Select Expand All Tracks from the menu.
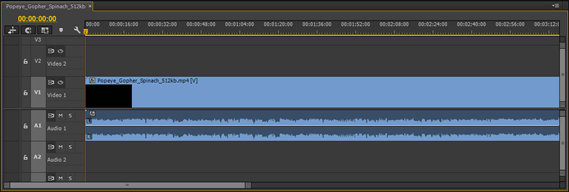
As you can see in the snapshot above, the height of each track is expanded. We can now see some content. We have one video track, then an audio track that shows the left (L) and right (R) speakers.
If you want to minimize the tracks, go back to the Timeline Display Settings menu, then select Minimize All Tracks.
Expanding Video or Audio Tracks
To expand either video or audio tracks, grab one of the edges of the vertical zoom bar for either the audio or video track. Drag inward if you want to increase the size. Drag outward if you want to decrease the size.
Expanding the Height of a Single Track
Sometimes you may only want to expand the height of one track. Perhaps it is the one you are working on.
To do this, go to the track header area.
Put the mouse pointer at the top of the track you want to expand.
You will then see the height adjustment pointer. You will see a light grey line at the top of the track, as shown below.
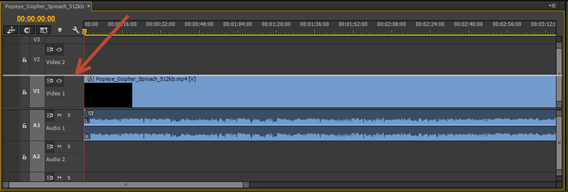
Now you can drag upward to expand the track. Drag downward to decrease the size of the track.
Turn Track Thumbnails On or Off
By default, whenever a video track is showing in the Timeline, you can see thumbnails that are visible when you expand the track. You can see the thumbnail of our video below.
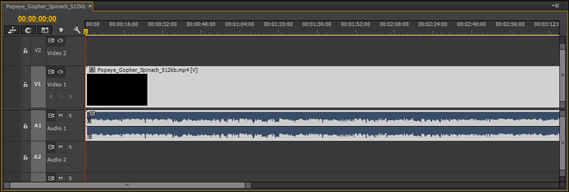
These video thumbnails are enabled by default. However, you can disable them – and re-enable them – whenever you want.
To disable thumbnails, click the Timeline Display Settings button, then select Show Video Thumbnails.
If there is a checkmark beside it BEFORE you select it, then selecting it will disable the feature.
Click to put a checkmark beside it to enable the feature.
Customizing Thumbnail Appearance
You can also customize the way thumbnails appear in the timeline. To do this, go to the panel menu.
Choose one of the three options listed below:
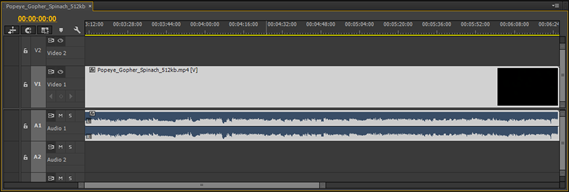
Video Head and Tail Thumbnails shows a thumbnail of the first frame and last frame. There is blank space in between. In the snapshot below, we scrolled across to the last frame. You can see the thumbnail.
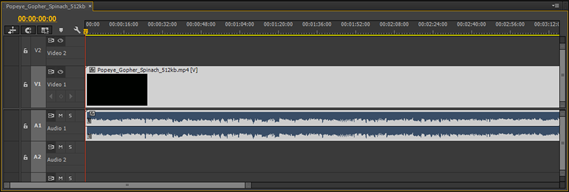
Video Head Thumbnails shows the first frame, then blank space.
Continuous Video Thumbnails shows all thumbnails in the clip.
Working with Audio Tracks
You can also customize the appearance of your audio tracks in Premiere Pro.
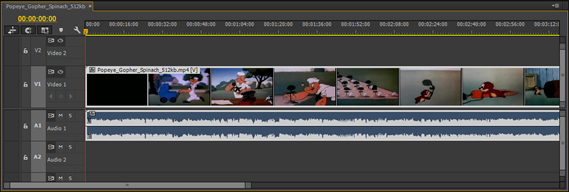
In the snapshot below, we see the waveform of our audio track.
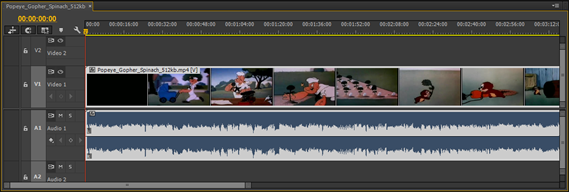
The waveform you see in the snapshot above is called a Rectified Audio Waveform. The positive and negative values of the waveform are combined so you only see a single positive value from the bottom of the track. However, you can also view the traditional waveform if you wish.
The rectified waveform is the one shown by default. To see the traditional waveform, go to the panel menu and select Rectified Audio Waveforms.
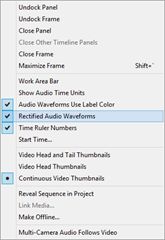
If you want to switch back to Rectified Audio Waveforms, simply go to the panel menu again.
Place a checkmark beside Rectified Audio Waveforms.
Adding a Single Audio or Video Track
The number of video and audio tracks displayed on the Timeline can be controlled by creating a preset. Tracks can always be added or deleted while you are working in Premiere Pro as well.
To add a single track, right click in the video track header area to add a video track. Select Add Track from the menu.
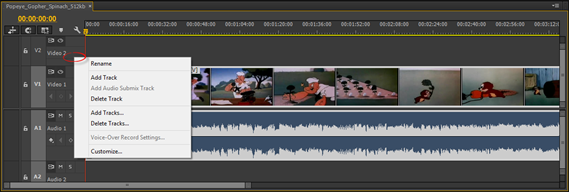
To add a single video track, right click in the audio track header area and select Add Track.
If you want to delete a track, right click in the header area, then select Delete Tracks.
If you want to add multiple tracks, right click in the header area. Select Add Tracks.
You will then see the Add Tracks dialogue box.
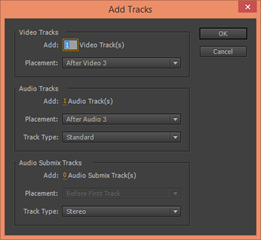
In the Add field, enter a number of the number of tracks you wish to add.
Select the placement of these tracks in the Placement field.
Do the same thing for audio tracks in the Audio Tracks section (pictured above).
For audio tracks, select a track type. Premiere Pro has six different audio tracks:
-
Standard can have both stereo and mono audio tracks. It is the default setting.
-
Mono has one audio channel. A stereo file is converted to mono in Premiere Pro.
-
5.1 is 5.1 surround sound tracks. This includes three front audio channels. These are left, center, and right. It also includes two rear channels, left and right, plus a low-frequency subwoofer channel.
-
Adaptive can have mono or stereo tracks.
-
Audio submix track is a synthetic track that does not have any audio other than the audio that is sent to it from other audio tracks.
-
Master audio track . This controls the output of all tracks in the sequence. It allows you to adjust the volume for tracks using a single slider in the Audio Mixer.
If you want to delete multiple tracks, click in the header area, then select Delete Tracks.
You will then see the Delete Tracks dialogue box.
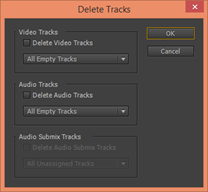
Identify the tracks that you want to delete.
Click OK when you are finished.
Changing the Timecode Display Format
In Premiere Pro, you can choose from two different Timecode display formats. These are Drop-Frame Timecode and Non Drop-Frame Timecode.
Let's look at the difference between the two in order to help you decide which you should use.
Drop-Frame timecode should be used if you are creating a video that has to be a certain time length, such as ninety minutes. Here's why. Timecode really has little to do with the actual time. Instead, they mark specific frames in the video which occur at 29.97 fps (frames per second). That means 30 frames of a 29.97 video take almost a second, but not a complete second. A one hour video actually has the time of 60 minutes and 3.6 seconds. If your video will be broadcasted, and you only have an hour, this could be a problem. Well, Drop-code timecode skips ahead two frames every minute – except for the tenth minute. Frames are not dropped. Do not worry. The timecode jumps.
Drop-frame timecode is displayed with semicolons. Non drop-frame timecode uses colons.
To choose a timecode display format, go to the timecode in the Timeline. You will see your mouse pointer change to a hand with two arrows. Do not click your mouse! Instead, right click.
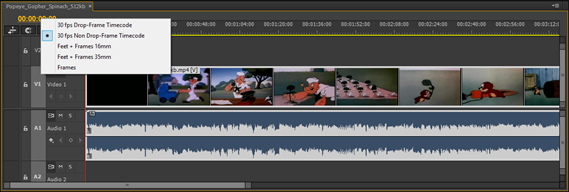
You can then choose Drop-frame or Non Drop-frame from the menu.


